Having even the most basic video editing skills is an important asset. After all, videos are one of the primary ways to communicate with people, especially if you’re aspiring to be a video editor or creator.
If you want to start learning video editing because of work or school or are just curious about what it can offer, this guide will walk you through everything you need to know to start your journey. It’s best for you to start with the best free editor.


Before learning to edit videos, you should understand what a video editor is for. This includes learning about its core functions and role in today’s world or the possible benefits of using a video editor.
A video editor is a powerful digital tool that transforms raw footage into polished, professional content. Think of it as a digital workshop where video clips, audio tracks, graphics, and effects combine to create compelling visual stories.
At its core, you should expect a video editor to be able to combine multiple videos and audio clips or at least give you features to trim and cut unnecessary footage. People often look for ways to add transitions between video clips or what is commonly known as “scenes.” Aside from this, the ability to add text, graphics, and other special effects is also a big plus.
Of course, video editors play a significant role in content creation. They are the primary medium by which your favorite personalities or influencers make professional-looking content for you. They are also why marketing and business firms can produce high-quality and sophisticated content that they deliver through ads, posts, or commercials.
While often overlooked, choosing the right video editor can make or break your relationship with video editing. Thus, as you walk through your video editing journey, rely on the best video editors for PC, like Wondershare Filmora.
Filmora emerges as a standout solution for creators at every level. This powerful yet accessible tool makes professional-grade editing and beginner-friendly navigation a possibility. This means that even if you’re starting to learn video editing, you can explore the tool comfortably.
Its user-friendly interface, affordable pricing, versatility, and consistent updates make it a great companion throughout your video editing journey.

Filmora has a lot of features to explore. However, since you’re just starting, here are some key features that you’ll be sure to love and enjoy as you use the tool:
Now that you know what makes Filmora video editor one of the best tools for learning video editing, look at the basic steps to start using it. This guide will encompass steps to use it on Windows, Mac, and mobile (Android and iOS).
Here’s how you can use Filmora’s Windows desktop version:
Step 1: Download, install, and launch Wondershare Filmora. Log in or sign up with a Wondershare, Facebook, Google, X, or Apple account.
Step 2: Under the Create Project tab, select the Aspect ratio for your project and start a New Project.
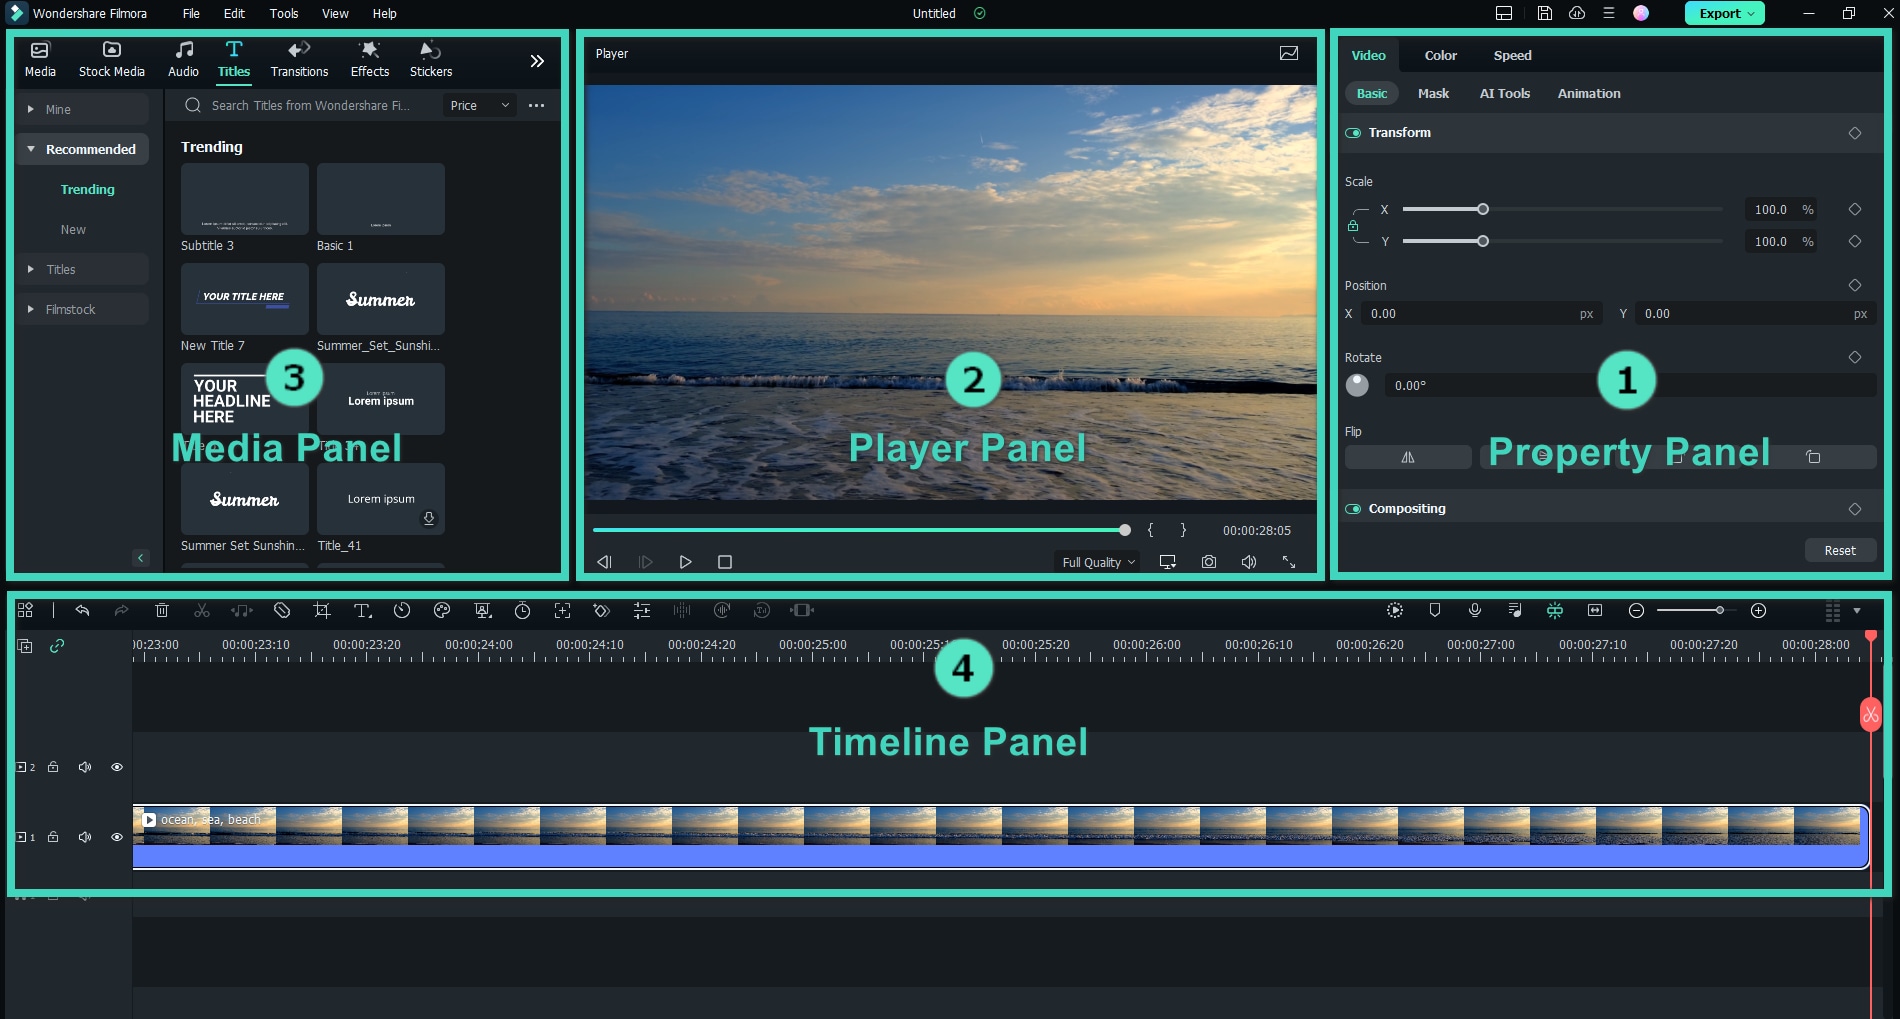
Step 3: You’ll be greeted with this interface. Here’s how you can make use of the layout’s different panels:
Step 4: Now that you’re familiar with the layout, drag and drop files from the Media Panel to the Timeline Panel and edit them accordingly.
Step 5: After editing, Export the content you’ve made.
There’s nothing different with using Fimora’s Mac version from the Windows version. But, to give you some guidance as to the tool, here are the steps to use it:
Step 1: Download, install, and launch the Mac version of Filmora. Then, log in using the account you use with Filmora.
Step 2: Just the same, go to Create Project and choose the appropriate Aspect ratio. Then, proceed to the editing interface with the New Project.
Step 3: Check out the similar panel layout. It also has the Media Panel, where you can access and upload different content; the Player Panel, where you can see the video you’re working on; the Property Panel, where you can access other editing tools; and the Timeline Panel.
Step 4: Export the content once you’ve finished editing your video.
Lastly, if you’re a mobile video editor, here’s how to start using Filmora on an Android or iOS/iPadOS phone/tablet.
Step 1: Download, install, and launch Filmora mobile. Log in with the same account you’ve used on the desktop versions.
Step 2: Create a New Project and Import your project’s first video/photo.
Step 3: Now, here are the different parts of the interface you should take note of:
Just having the right tool is not enough. You should also have some guidance. Thus, here are some recommended channels you can watch to learn more about video editing skills.
If you’re learning to edit with Filmora, look no further than the official Filmora YouTube channel. Here, there are many video editing tips, tricks, and tutorials that are tailor-fit for the tool you’re already learning in the first place.
Storysium is also a good choice for basic video editing tutorials. They have very niche tutorial videos, such as how to add a logo reveal and transitions, and they teach more in less than 10 minutes. Thus, they will take less of your time.
Lastly, for theory-based or creative editing tutorials, Hillier Smith is the creator to go for. His podcast and YouTube videos are beneficial in teaching you how to navigate different video editing problems, as well as tips for various genres of videos.
And there you have it! Those are some of the basic steps and ideas you must learn when looking to start your luck or career in video editing. Remember to rely on the Filmora video editor – it’s one of the best tools that offer features like AI subtitle generators and the essential and advanced tools you need to be a good editor.
Comparing documents side by side or running multiple programs at once can be frustrating. It…
Jewelry has been an integral part of human culture for thousands of years. Whether symbolizing…
By: Emily Hirsch, MS, RD, LDN When you’re on GLP-1 medications that constant nagging about…
In a world where leadership is constantly being redefined, these five remarkable women have risen…
A couple of years back, 3D printing felt like something designed for engineers or sci-fi…
For watch collectors and enthusiasts, automatic watches are more than just accessories—they’re investments, heirlooms, and…
This website uses cookies.